
Steve Chikwiri
onboarding screens

Building UIs is fun; as a developer, you get to piece together widgets and craft them into screens that make up your app's UI flows. However, you may find yourself in situations where accessing a particular screen requires multiple steps or depends on some backend data; hence, getting to that screen can be pretty complicated. In this article, we'll delve into how debugging hard-to-reach-use-cases can be frustrating and painful and how we can fix that.

Scenario

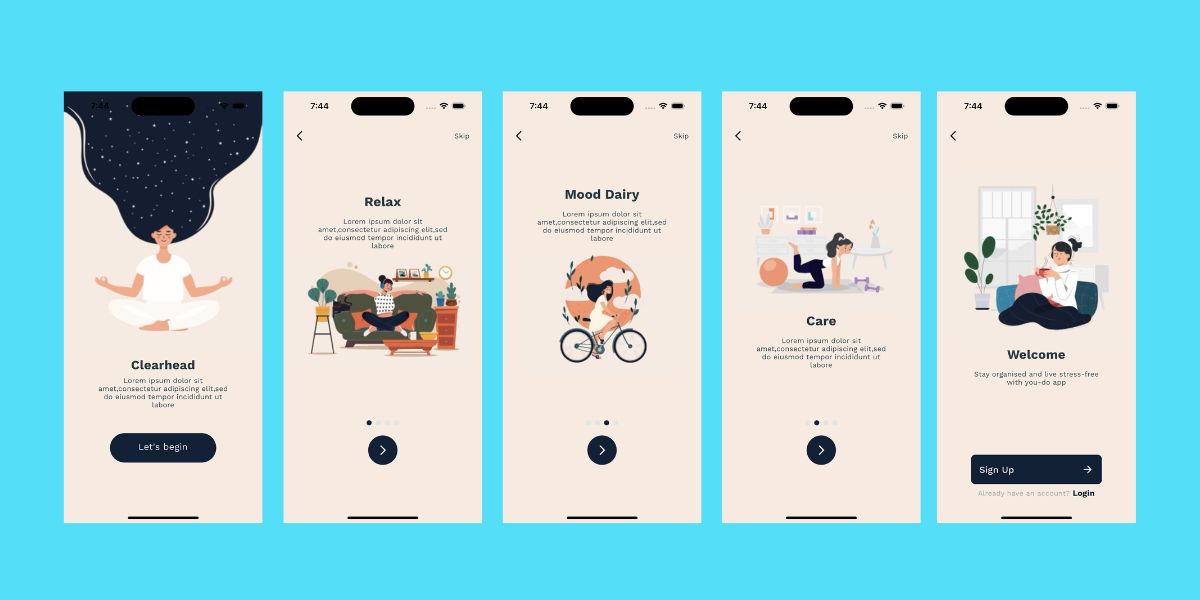
Let's paint a familiar picture: Say we have a five-step onboarding flow, and there's a bug on the fifth step of the flow– some text is overflowing into an image widget. To address this, we would typically follow this rather cumbersome process:

  1. Launch the simulator.
  2. Launch the app and wait for it to load.
  3. Realise we're already logged in.
  4. Uninstall the app.
  5. Reinstall it.
  6. Launch the app once again.
  7. Tap through the first, second, third, and fourth onboarding screens.
  8. Arrive at the fifth screen where the issue is.
  9. Finally make the changes.
  10. Repeat this entire process for each subsequent change.

This process is not only inefficient but also incredibly frustrating. It consumes valuable time and effort and is a significant drain on productivity. The annoyance of having to repeat these steps over and over again can lead to subpar app quality as developers naturally seek to avoid such tasks.

What if

What if we didn't have to go through this pain? What if there was a more efficient approach? What if you could make hard-to-reach use cases more accessible and straightforward to debug?

The Monarch way

That's where Monarch's magic comes into play. Instead of running your entire app or navigating through countless screens to access the desired UI element, you can use Monarch to preview these UI elements. To do this, all you have to do is isolate your widgets and write stories for them. Stories act as shortcuts, making the once hard to reach use cases just one click away.

With that in mind, let's revisit our onboarding example and see it in action, this time streamlined using stories:

Widget full_onboarding() => IntroductionAnimationScreen();

Widget onboarding_1_splash() =>
IntroductionAnimationScreen(initial: 0.0, target: 0.0);

Widget onboarding_2_relax() =>
IntroductionAnimationScreen(initial: 0.0, target: 0.2);

Widget onboarding_3_care() =>
IntroductionAnimationScreen(initial: 0.2, target: 0.4);

Widget onboarding_4_mood() =>
IntroductionAnimationScreen(initial: 0.4, target: 0.6);

Widget onboarding_5_welcome() =>
IntroductionAnimationScreen(initial: 0.6, target: 0.8);

Using the stories we’ve written above, we can now directly access any step of the onboarding flow:

Benefits of using Monarch

  • Efficiency: Say goodbye to time-consuming setups and repetitive actions. Monarch streamlines your workflow, making UI development more efficient.
  • Productivity: With Monarch, you can work at a faster pace, iterate more swiftly, and resolve UI issues with ease.
  • Creativity: Monarch encourages a playful and creative approach to UI development, empowering you to experiment and innovate.
  • Improved Quality: The ability to test, debug, and tweak the UI in isolation ensures a higher quality of the final product, leading to a better user experience.

The pain of navigating complex UI flows, and hard-to-reach use cases is alleviated with Monarch. Monarch empowers developers to embrace a state of play where creativity thrives and good work flourishes. You can prototype, build, tweak, debug, and test your UI easily and responsibly. With Monarch, your entire UI is just one click away.

Steve Chikwiri

Intro

RenderFlex overflowed. As a Flutter developer you have probably seen this error a million times. You put together some widgets to make a beautiful UI and it works perfectly. Until someone runs it on a different device, with a different screen or font size now your text is overflowing, widgets are overlapping and that beautiful UI is gone.

Often times we build UIs that work for ideal situations, however, the apps we make run in the most unexpected conditions and we must be able to take those situations into account. Our app UIs must be built to withstand as many edge cases as possible, the different screen and font sizes, languages and even orientations. However, catching these edge cases is hard, especially for UIs, not withstanding the fact that edge case testing can be time consuming.

To find edge cases, you need to spend time and play around with your app. It is through playing that we learn the most about whats possible, impossible and further what breaks our app UIs.

Testing on the Edge

Edge cases occur at the extremes of your app's functionality. They often hide subtle bugs that can wreak your users' experience. Using the below screen that shows a set of filtering options, let's play around with the device and text sizes and try to catch some bugs in the related edge cases.

Bottom up slide transition

1. Preview on the Smallest Device

Previewing the screen on the smallest device our app supports helps us identify issues related to layout, cramped visuals, and overflowing content.

2. Preview on the Largest Device

Next, we'll preview the same screen on the largest device our app supports. This test ensures your app scales gracefully and doesn't break when elements are stretched.

3. Small Text Scale Factor

Now, let's change the text scale factor to its smallest value. This might trigger issues like unreadable content, accessibility, or overlapping elements.

4. Large Text Scale Factor

Here, we'll increase the text scale factor to its maximum value. Observe how the UI handles this extreme situation. Problems related to text wrapping, oversized text, or misaligned elements may surface.

Here's a video showing the edge case test with Monarch in action

Why you should isolate your widgets

  • Isolation gives you more control of the parts of your UI that you can play around with and apply edge cases. When you isolate, you can test your edge cases on the entire screen, just a section, or down to a single widget like a textview or a button. With this level of control, you can test more edge cases and debug more efficiently.
  • Isolation allows you to test parts of your UI flow without dealing with the related business logic, backend, or navigation to access it. For instance, in a 3-step login flow, all you'll need to do to access the third step of the flow is to write a story for it, and that's it; you have direct access to that screen.
  • When you isolate your widgets and use Monarch to preview them, you get more options to test edge cases related to themes, internationalization, and device type and size. All with little to no hassle.
  • Isolating your widgets also makes it much easier to reproduce edge case scenarios.

Automating Edge Case Testing with Monarch

As we advance, we plan to automate edge case testing. Imagine a world where Monarch automatically previews stories at various edge cases and reports any errors directly to you. This approach will save time, enhance your app's reliability, and elevate user satisfaction.

In conclusion, edge case testing is not just an optional step in development; it's a crucial aspect of building robust and reliable Flutter apps. Monarch, with its ability to facilitate comprehensive edge case testing, empowers you to deliver a flawless user experience.

Steve Chikwiri
Bottom up slide transition

When building apps with multiple screens, it is essential to make the transitions between them appear seamless rather than abrupt. To achieve that, standard practice is to use transition animations(e.g., fade in, slide in, etc.) when navigating between screens. However, testing and tweaking these interactions within your full app is time consuming. Let's explore why isolating these transitions is good for you.

Why you should isolate your page transitions

By isolating your interactions, you can easily play around with different animated transitions by changing their durations, behavior, and patterns until you find the one that works best for your app without changing your main codebase. A great custom transition can make your app stand out and more unique.

More importantly, isolating interactions enables you to test them independently without relying on the rest of your app or backend data. Like in most apps, the screens in your app often depend on preceding states or backend data. As a result, it necessitates navigating through multiple screens each time you want to test an interaction, making the process such a hassle and time-consuming. By isolating interactions, you can directly access and play around with your interactions without having to navigate through numerous screens or fulfill business logic every time.

Writing stories for interactions

To demonstrate how isolation makes your work as a developer easier, let's write some stories for the ExpenseListWidget shown at the top of the page that transitions into a Details Screen. Using the stories and Monarch, we will play around with our interaction by changing some variables to find an animation we like.

First, let's set up the ExpenseListWidget. It exposes a transitionBuilder callback whose return value we can change around to get various animations.

class ExpenseListWidget extends StatelessWidget {
final List<Expense> expenses;
final RouteTransitionsBuilder transitionBuilder;

const ExpenseListWidget({
super.key,
required this.expenses,
required this.transitionBuilder,
});


Widget build(BuildContext context) {
return ListView.builder(
itemCount: expenses.length,
itemBuilder: (BuildContext context, int index) {
var expense = expenses[index];
return GestureDetector(
child: ExpenseCard(
expense: expense,
),
onTap: () {
PageRouteBuilder pageRoute = PageRouteBuilder(
pageBuilder: (context, animation, secondaryAnimation) =>
DetailsScreen(expense: expense),
transitionsBuilder: transitionBuilder,
);
Navigator.of(context).push(
pageRoute,
);
},
);
});
}
}

No Transition

Our first story will test what the interaction is like without an animated transition. To do that, our story will pass to the ExpenseListWidget a TransitionBuilder callback that simply returns the child parameter without any animations applied to it.

Widget noTransition() => ExpenseListWidget(
expenses: expenses,
transitionBuilder: (context, animation, secondaryAnimation, child) {
return child;
});

Bottom-Up Slide Transition

Next, let's try a transition that slides in the next page from the bottom. To do that, we'll change the TransitionBuilder callback to return a SlideTransition animated widget that takes the child parameter and an offset animation with begin and end offsets set to Offset(0.0, 1.0) and Offset.zero, respectively, like below:

Widget bottomUpTransition() => ExpenseListWidget(
expenses: expenses,
transitionBuilder: (context, animation, secondaryAnimation, child) {
final tween = Tween(begin: const Offset(0.0, 1.0), end: Offset.zero);
Animation<Offset> offsetAnimation = animation.drive(tween);

return SlideTransition(position: offsetAnimation, child: child);
},
);

Right-to-Left Slide Transition

Finally, to try out a right-to-left slide transition, we’ll have a callback similar to the previous one, except in this, the begin offset value in the Tween is set to Offset(1.0,0.0) like below:

Widget rightToLeftTransition() => ExpenseListWidget(
expenses: expenses,
transitionBuilder: (context, animation, secondaryAnimation, child) {
final tween = Tween(begin: const Offset(1.0, 0.0), end: Offset.zero);
Animation<Offset> offsetAnimation = animation.drive(tween);

return SlideTransition(position: offsetAnimation, child: child);
},
);

Preview your stories in Monarch

After executing monarch run in the terminal, we can now click through each story to see each transition behaves and pick the one we like as below:


Breaking down your transitions into stories opens up the opportunity to do more with your transitions beyond what's been demonstrated in the stories above. For instance, you can also play around with the animation curve, which alters how transitions roll in and/or out. Among other Curves, you can play around with Curves.ease, Curves.easeIn or Curves.easeInOut, and find what works best for your app.

Why Monarch

  • Monarch lets you easily play with your transitions, and with all of your UI, which makes you more productive.
  • Directly reach the widgets and interactions you want to test without having to navigate through multiple screens.
  • With monarch, you can visually debug your page transitions via the “slow animations” flag
  • Monarch gives your UI the best isolation possible which enables to test full screen interactions like page transitions. Other tools can’t do this.

Your job as a Flutter developer is hard. Isolate your UI and use Monarch to make your job easier. Use Monarch to prototype, build, and test your UI. Use Monarch to play with your UI, to feel productive, creative, and satisfied. This is what we like to call The Monarch Way.

--

The complete code is available here.

Fernando Trigoso

Isolated square

If you are building a UI in isolation, the tool you use should also preview your UI in isolation. The more isolation of your preview the better. When your tool previews your stories in isolation, you have more power.

Monarch previews your stories inside their own dedicated window. With Monarch, all you see in the preview are your widgets, nothing else. Monarch also runs your stories inside their own Flutter app. The Monarch controls are in a separate application running in a separate memory space.

We believe that Monarch needs to run your stories in the best isolation possible. We have designed Monarch around this belief. Some of these design choices were hard. They meant more work for us. And we are so happy we chose this path.

Other tools don't preview your stories in isolation. Other tools preview your stories alongside other controls. Thus, your preview is surrounded by code and inside widgets that are not yours. This approach creates problems and limitations for you.

Since Monarch gives you the best isolation possible, here is a list of things you can do with Monarch that you can’t do with other tools:

  • You can have stories that launch dialogs, modals, etc.
  • You can write stories that do navigation and routing.
  • You can see guidelines and baselines.
  • You can slow down your animations.
  • You can detect images that are too big.
  • You become more productive by visually debugging.
  • You can easily debug the source code of your stories.
  • You can reuse your stories from your widget tests.
  • Etc.

And, as we add more features to Monarch, you will be able to do more things that other tools won't be able to do.

When it comes to building Flutter UIs, isolation is the way.

Fernando Trigoso
Monarch is growing

It's been 7 months since our last newsletter and we have been busy!

Monarch is faster 🏎 💨

We made Monarch reloads much faster. Based on our metrics the initial reload of stories went from 10 seconds all the way down to 1 second! Subsequent reloads are also faster by as much as 2x.

Monarch now runs on Linux! 🚀🤓

Monarch has been running on Linux for a few months. You can run Monarch on Linux in the stable or beta branch. You can also build Monarch yourself on any platform.

We welcome all Linux users to the Monarch community!

We adapted to change 🐛🦋

We experienced many changes these past few months:

  • The Flutter APIs that Monarch uses changed which caused several breaking changes for us.
  • Our users reported several issues in the Monarch repo.
  • We now maintain Monarch on all 3 major desktop platforms (macOS, Windows, and Linux).

Some of these changes were unexpected, painful, and hard. We learned to embrace these changes and Monarch is better for it.

  • We now have better automation than ever before.
  • We improved our test coverage with unit and integration tests.
  • We released Monarch 7 times this year alone which helped us improve our release process.
  • We have closed more issues in comparison to the number of new issues reported by our users.
  • We ended up with better documentation and sample projects.
  • We let go of things that were holding us back.

The Monarch growth is real.

Meetups, conferences

We want Monarch to continue to grow, thus we will get out into the wild more. We will do more meetups and conferences. We will also engage more with the community.

On July 19th, we will be in Charlotte, North Carolina. We will present Monarch to the Flutter Charlotte meetup group. If you are in the area, we would love to see you!

We are also thankful that a Monarch user spontaneously gave a talk about Monarch at the Flutter Forward Extended event in Nairobi, Kenya. Thank you @schiquiri!

Did you know? 🧐

  • You can use debugPrint to print debug statement to the terminal where the Monarch CLI is running. See Print to the console.
  • The monarch_samples repository has many sample projects which can help you develop your own widgets in isolation and also apply Monarch in your projects.
  • Monarch can render your app's theme via the @MonarchTheme annotation. See the Themes docs.
  • If your app supports multiple languages, Monarch can render your stories using your locales. See the Internationalization docs.

Stay tuned

We are super excited about a new experience we are crafting. If we can pull it off it will be super cool and a major value-add to all Monarch users.

Make sure you subscribe to our newsletter to stay tuned. The future is exciting!

Fernando Trigoso

This release updates the device list in Monarch. You can now test with the latest iPhones, iPads and Android devices (issue).

Also, this release fixes gRPC errors macOS users were experiencing after heavy usage of Monarch (issue)

Fernando Trigoso

This release brings changes to better support Flutter 3.10. Flutter 3.10 deprecated some APIs the monarch package and CLI were using.

This latest Monarch release uses the latest and greatest Flutter APIs. See pull request #99 and pull request #100 for more details.

Also, since Flutter 3.10 made it to stable, then Monarch Linux is also stable. Previously you had to be on Flutter beta to use Monarch on Linux. Now, you can use Monarch on Linux on the Flutter stable channel.

Fernando Trigoso

This release makes reloading stories in Monarch much faster (pull request). Based on our metrics, reloading stories is 10 seconds faster than before. 🏎 🚀

We have also added integration tests to the Monarch repo (pull request). And we have made the tools scripts that build and test Monarch easier to use for contributors (pull request).

Fernando Trigoso

This release adds support for Flutter 3.9 (pull request). Also, Monarch now fully supports Windows 11 and Visual Studio 2022 (pull request).

Lastly, this is the fist Monarch release with downloadable Monarch binaries for Linux. Linux users don't have to build the Monarch source code anymore. They can just download it from the install page.